
Google Apps Guides & Tutorials
You may also access Google Apps video tutorials on the Tech In a Sec page!
Also, click here for Google-developed instruction and tutorials.
Also, click here for Google-developed instruction and tutorials.
|
Transferring First Class Contacts to Google Mail |
Backing Up First Class E-mail to Your Computer |
Mobile Device Setup |
Google Mail
|
Google Calendar
| ||||
Google Forms
| Google Apps Basics | Forms |
Transferring First Class Contacts to Google Mail
Transferring First Class Contacts to Google Mail |
Backing Up First Class E-mails to Your Computer
Backing Up First Class E-mails to Your Computer | ||||
Click on each category below to expand each section to access text and video tutorials.
Mobile Device Setup
Android Devices
To use the native Google Apps mail, contacts, and calendar apps on your Android, you need to sign in to your Google Apps account. You only have to do this once:
That's it! You can now use Google Apps from your Android. Just launch Gmail, Google Calendar, or whichever app you want to use, from your device's home or applications screen.
-
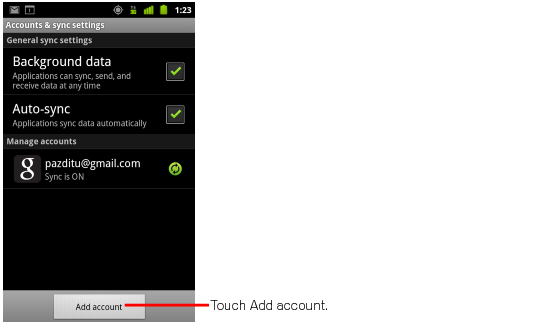
Open the Accounts & sync Settings screen on your device. You can do this in Contacts by pressing Menu and pressing Accounts, or directly in the Settings application.
The Accounts & sync settings screen displays your current sync settings and a list of your current accounts. - Touch Add account.

- Touch Google to add your Google Apps account.
- Touch Sign in when prompted for your Google Account.
- Enter your full Google Apps email address as your username, and then enter your password.
- Select which services you'd like to sync.
That's it! You can now use Google Apps from your Android. Just launch Gmail, Google Calendar, or whichever app you want to use, from your device's home or applications screen.
iOS Devices (iPhone/iPad)
Adapted from Google tutorial found at: http://support.google.com/a/users/bin/answer.py?hl=en&answer=138740&topic=2747518&ctx=topic
1. Open the Settings application on your device's home screen.
2. Open Mail, Contacts, Calendars.
3. Press Add Account....
4. Select Microsoft Exchange. iOS 4.0+ allows multiple Exchange accounts. However, if you're on a device that doesn't let you add a second account, you could also use IMAP to sync Gmail, CalDAV to sync Google Calendar, and CardDAV to sync contacts.
Enter Account Info
5. In the Email field, enter your full Google Apps email address (computer login username + @joplinschools.org).6. Leave the Domain field blank.
7. Enter your full Google Apps email address (computer login username + @joplinschools.org) as the Username.
8. Enter your Google Apps password as the Password.
9. Tap Next at the top of your screen.
10. When the new Server field appears, enter m.google.com. 11. Press Next at the top of your screen again.
iOS6 - Follow steps 6b-11b directly below:
6b. Enter your Google Account password as the Password.
7b. Press Next at the top of your screen.
8b. Enter m.google.com in the Server field.
9b. Leave the Domain field blank.
10b. Enter the user email address as the Username.
11b. Press Next at the top of your screen again. Skip to step 12.
Enable Mail, Calendar, and Contacts
12. Select the Google services (Mail, Calendar, and Contacts) you want to sync. To receive and respond to meeting requests on your device, both Mail and Calendar need to be turned on, and New events needs to be enabled in your Google Calendar settings.To enable 'New events', sign in to your Google Calendar using the web browser on your phone or computer. Go to Calendar Settings > Calendars > Click on the Notifications for the calendar you want to sync. Under Email check 'New events' (and any of the other Invitation settings you want enabled e.g. changed events, cancelled events, event responses), and click Save.
13. There are three options for keeping your contacts synced. You can keep your device's contacts and sync just your My Contacts group, you can sync only Google Contacts and wipe your device's contacts, or you can merge your contacts via iTunes and sync only the contacts that stream with your phone.
13a. If you would like to keep your existing contacts on your device select the Keep on my iPhone (or iPad or iPod touch) option when prompted. This will also allow you to keep syncing with your computer via iTunes. If you choose to keep existing contacts, you will sync the contents of the My Contacts group.
13b. If you have all your contacts in Google and you want to start syncing them to your device and don't want to keep the contacts on your phone, tap Delete Existing Contacts. If there are no contacts on your phone, the contents of your All Contacts group will be synced.
13c. If you have all your contacts on your device and want to import them into Google, you can synchronize your Google Contacts with iTunes. All Contacts and Calendars that you sync with iTunes will be put into the On My iPhone Contacts and Calendar groups on your phone. iOS currently doesn't allow you to move Contacts or Calendar events from the On My iPhone groups to the Google Sync groups.
You've set up Google Sync! Synchronization will begin automatically if you have Push enabled on your device. You can also open the Mail, Calendar, or Contacts app and wait a few seconds to start a sync.


